After implementing AdMob for the first time, when trying to use it in your daily work, you will probably have questions about various functions and settings, as well as the jargon scattered around in AdMob user interface may seem daunting. This volume explores day-to-day operations and uses of AdMob. The goal of Chapter 1 is to help you become familiar with AdMob’s reports so that you can review your daily earnings and see how they vary by inventory.
If you have any questions you would like to ask to an tech expert right now, or if you would like to learn more about our services, please click the image below to contact us.
index:
1. How to use AdMob reports to check ad earnings
2. Building reports
3. Ad blocking controls
4. Other elements in the AdMob user interface
5. Troubleshooting
1. How to use AdMob reports to check ad earnings
We have gone through the process from creating an AdMob account to the actual placement of ads in the previous volume. We recommend going back to that volume if you haven’t yet started using AdMob. Once ads are all set, the next thing you would probably be interested in is the specific amount of earnings that will come from them.
So, let’s look into the features of AdMob reports, that allows you to check your app’s earnings. There are many things you can do with the Reports, not only reviewing your daily earnings, finding tips on how to increase your earnings, but also looking for causes if your earnings drop.
1. Opening reports
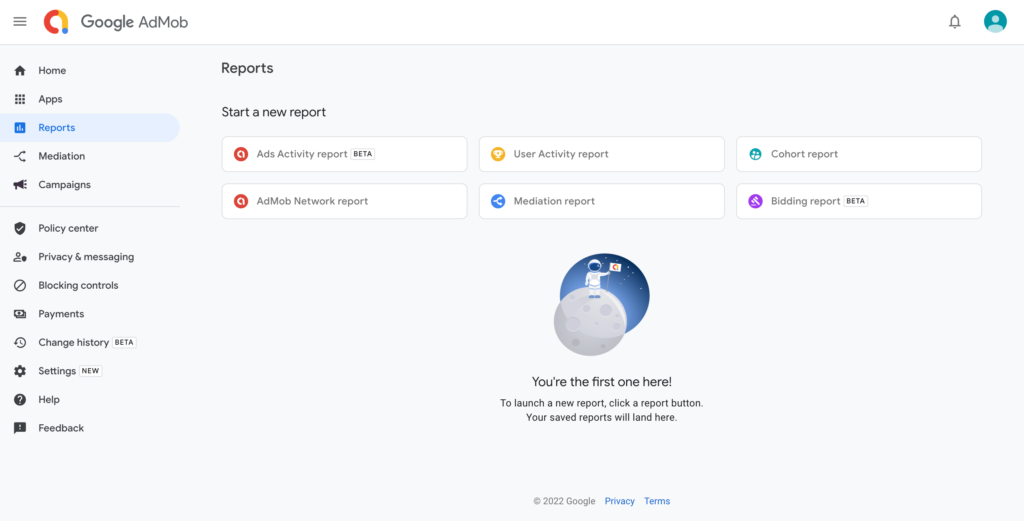
Navigate to Reports > AdMob Network report in Start a new report

What you see in Start a new report are:
‘AdMob Network report’: Reports on data about the AdMob network’s earnings and the factors that affect the earnings. As a side note, the ads on the AdMob network are the same as those on Google AdSense. That’s the reason why AdMob can generate high earnings.
‘Mediation report’: Reports on non-AdMob ad networks that are delivered via the AdMob network. I will cover mediation in detail later in ‘Vol. 4.’ For the moment, the only thing you need to understand is that “data outside of the AdMob network is referred to as mediation.”
2. Generating reports
The following metrics are available for AdMob Network reports by the default setting:
’Estimated earnings’
’Impressions’
‘RPM’
‘AdMob Network’
The above metrics for the last 7 days are shown by default on a chart of all apps, but this can be changed.
CTA’s and others

1) X: Close the reports and return to the Start a new report.
2) (Report title): If it is a saved report, the report name you set is displayed. It is ‘AdMob Network Report’ by default.
3) SAVE TO REPORTS: Save and name the report configured at a point.
4) Add chart: Add another metric chart beside the already displayed.
5) More options: Configure your report, show or hide charts, switch currencies, download reports as csv, etc.
6) Filters: Narrow the scope of the report. Each additional filter narrows the data to be reported. There are 5 filters available:
Date range: Must be set up. The data range is updated each time the date changes except for custom settings, in other words, as one day passes, the data range also shifts by one day.
App: Set the apps for which you want to check data. Multiple apps can be displayed.
Ad unitt: Select the ad units for which you want to check data. You can make more detailed settings than on the Apps. You can also select multiple ad units.
Country: Select the countries in which the ads you wish to check data were served. This can be used to check the earnings for each country. Multiple selections can also be made.
Format: Select the ad format for which you want to view data. Multiple selections can also be made.
・Charts: They are the data charts selected by the filters. Charts can be added by the Add chart located in the header. Two types of charts can be set up: a chart for each metric and a chart that displays metrics by Dimensions.
・Metrics: Metrics are types of data displayed. There are two types of metrics: one is on earnings and another is on factors that affect earnings.
・Dimensions: It’s a classification criterion used to categorize and observe metrics from various angles.
It might take a slightly more detailed explanation for the Dimensions to understand it well. Below you can see a table comparing the number of impressions between July 1 and July 6 by operating systems. Let’s see how it will be after several dimensions are set in it.

As a reference example, we set up 3 dimensions for the table. See how the charts below change according to the dimensions (‘OS,’ ‘date’ and ‘date and OS’) which categorize the metric (impression) in the above table. The color navy shows data for iOS and the baby blue shows it for Android.

・OS shows how much the number of the impressions differs between iOS and Android.
・Date shows the difference in the number of the impressions by the date.
・Date and OS shows how the number of the impressions on iOS and Android changes with each
We’ve covered all the necessary configuration items to generate a report. Once you have arranged the above settings, click the SAVE TO REPORTS in the header. Now, you can find your report in Reports and are ready to open it.
2. Building reports
From here, we’ll talk about more practical matters such as “how to create reports in line with objectives” and “how to analyze from reports.”
When creating a report, it’s necessary to clarify what you want to know through the report. It is important to think about “what” and “how” to know, to be able to set up appropriate means to meet the objective. This is the same thing we do in our daily lives. We decide where to go on holiday according to what we want to do, or we choose ingredients according to the food we want to cook. In order to create reports with this relationship between purpose and means in mind, we show here how to set up your AdMob report according to common report objectives.
Exp. 1
・Objective: To know the amount of daily earnings for the past 7 days
・Filter: Last 7 days + (any given app)
・Metrics in Add chart: Estimated earnings
・Dimensions: Date
Exp. 2
・Objective: To know the number of clicks each ad unit in banner format has received in the past 7 days
・Filter: Last 7 days + Banner
・Metrics in Add chart: Clicks
・Dimensions: Ad unit
Little validation quiz for Reports analysis
Now that you’ve seen the two examples above, you may have a slight sense of how to set up reports in line with your objectives. So next, let’s try to determine the possible analysis objectives from the report settings below.
・Filter: Last 7 days + (any given app for iOS) + (the same app but for Android)
・Metrics in Add chart: Estimated earnings, Impression match rate
・Dimensions: App, Date
The followings are quiz answers:
Possible objective 1: To find out how much the same app has differed in earnings by the different operating systems over the past 7 days.
Possible objective 2: To find out if the difference in earnings by the operating systems over the past seven days can be attributed to the difference in Impression match rates.
If you pay much attention to the fact that the type of metrics selected is not only Estimated earnings, you could get close to the answer. For your information, the thing you must know to obtain the idea for Possible objective 2 is if the chart of Estimated earnings and Impression match rate have a similar shape, the difference in earnings by the operating systems can be attributed to the difference in Impression match rates.
It’s possible to analyze which factors are affecting earnings by charting and comparing multiple metrics. For a problem that is difficult to approach at first glance, such as “finding the cause of decrease in earnings,” it may be possible to find clues by setting multiple metrics and understanding the relationship between each metric, or by replacing metrics to identify those that are related to decrease in earnings. The metrics affecting earnings are AdMob Network requests, Show rate, and Impression CTR in most cases. Start with these when investigating the cause of the change in earnings.
That’s all for the AdMob Network report. If you have any questions or requests, such as “What items should I set up first?” or “How can I make my analysis more accurate?” please don’t hesitate to contact us. If you wish, we will be happy to set up an individual consultation with an expert.
3. Ad blocking controls
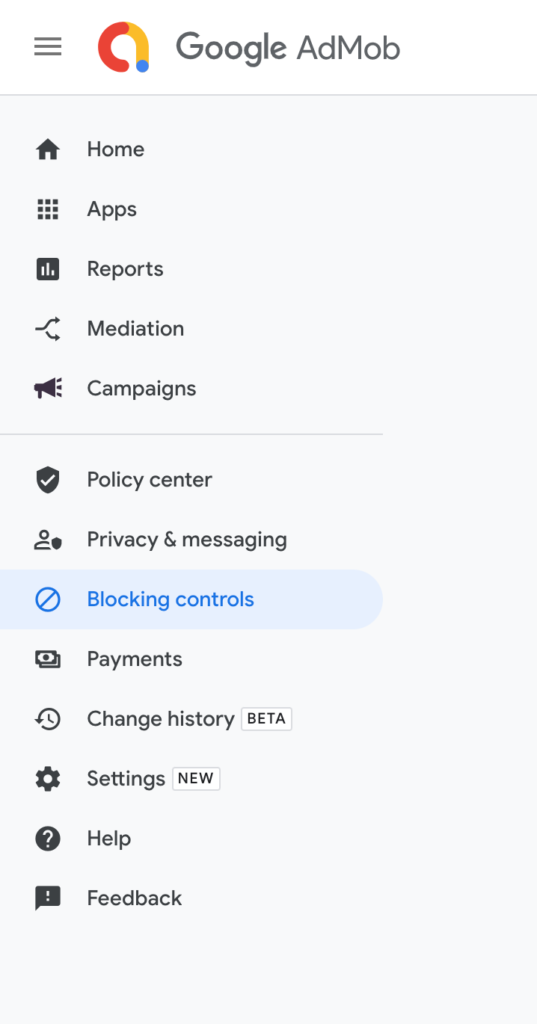
Not only in AdMob, sometimes there are undesired ads that users may find offensive or from that they get negative perception of an app on the network. By Blocking controls, located on the sidebar in the UI, you can set the ads you don’t want to appear on your app by general categories or domains.

There are several tabs in Blocking controls:
1.Ad review center: Where you can check and block ads appearing on your apps.
2.App install ads: Block ads that install another app when a user clicks them. In the search bar, enter the name of the app, the developer, or the app ID you want to block. You can block ads based on the advertiser’s URL.
3.Advertiser URLs: Set an ad not to show up by setting the URL of the ad.
4.Sensitive categories: It helps you to block ads in AdMob’s sensitive categories such as, Reference to sex, Gambling and Betting, Alcohol etc..
5.General categories: It can be used when you have to block ads by categories that are not sensitive. For instance, sometimes categories like Hobbies, Games & Leisure should be prevented from appearing in study apps. This is the tab you go to on such occasions.
6.Ad content rating: Like the film rating system, you can set age ratings for ad content displayed in apps based on age ranges of app users.
7.California Consumer Privacy Act: For apps distributed to users residing in the State of California, you can enable data processing in accordance with the California Consumer Privacy Act (CCPA).
8.EU user consent: For apps distributed to users residing in the EU, it can be configured to display a message asking users to consent to acquisition of data and its use.
9.Ad networks: Here you can block ads from third-party networks added in mediation by specifying their URLs.
The settings that frequently configured are 1-5, and are set up on the following occasions:
・Displaying ads for the first time: Configure 4, 5 to block ads by the categories, and 2 to block the app install ads if it’s necessary.
・In daily operations: Check 1 to see if there are any ads you don’t want to display.
・Finding specific ads you don’t want to display or getting complaints from users: Configure 1 or 3 to block the relevant ads.
It’s very important to:
・Ensure that ads you don’t want to show are blocked. ・Check the Ad review center to see if there are any ads you don’t want to display at least about once a week.
Blocking ads is something you want to do before you receive complaints from users and damage their impression of your app, but it’s also a fact that too many blocked ads can hurt your earnings. So, to help you decide whether to block them, here is an example of factors to focus on:
・Age range and gender of users
If users are mostly children or students, adult contents should be blocked. Consider what kind of advertising is valuable to users.
・The environment in which the user uses the app
If the app is to be used during commute or at work, ads that are acceptable for others to see are recommended, while ads that are somewhat flashy are appropriate for private places such as home.
If you want to know things like which categories need to be blocked based on the user profiles in your app, or how to configure the block settings when each app has a different user profile, please contact us. We’re always at your beck and call.
4. Other features in the AdMob User Interface
Hopefully, you’ve already got acquainted with the basic AdMob features. Now let’s take a look at the features of the user interface other than “Reports” and “Blocking controls” which we’ve already seen. If you have further questions on the two elements, feel free to get in touch with us.
Home: The home dashboard.
Apps: The respective app overview dashboard where you can create new ad units and set up the block controls for an app.
Mediation: Mediation allows you to add an ad network that’s not the AdMob network. We leave this topic for Vol.4 and 5.
Campaigns: Campaign is for placing specific ads or promoting other apps you have developed. It’s used to set up reservation ads that require direct communication with advertisers. If you have any problems with the detailed settings, please contact us for advice on how to set it up.
Policy center: If you are not confident that your apps don’t violate any policies, go to the Policy Center which allows you to check whether your apps violate the AdMob or AdSense policies. If your apps don’t comply with those policies, you’ll receive a warning message asking you to fix the app. If left unaddressed, you’ll get disabled ad serving to your apps or disabled your AdMob account, so take action as soon as possible. In case you receive warning messages and are not sure what to do about it, or if you don’t see any change after taking action, please contact us. We can offer helpful advice as a Google Certified Partner.
Payments: It shows the payment amount and history of earnings generated. You’ll be paid by Google when your earnings meet the payment threshold which varies depending on the reporting currency in your account.
Change history: History of changes you’ve made on AdMob.
Settings: You can configure, check and edit your account from here. E.g. changing your login email address, account information etc..
Help: AdMob Help will be displayed in a pop-up window when you click it. If you have any questions, try Help or ask the Help Community and of course, there is always the option of contacting us.
Feedback: Here you can send your impressions of AdMob usage and requests for improvement to Google.

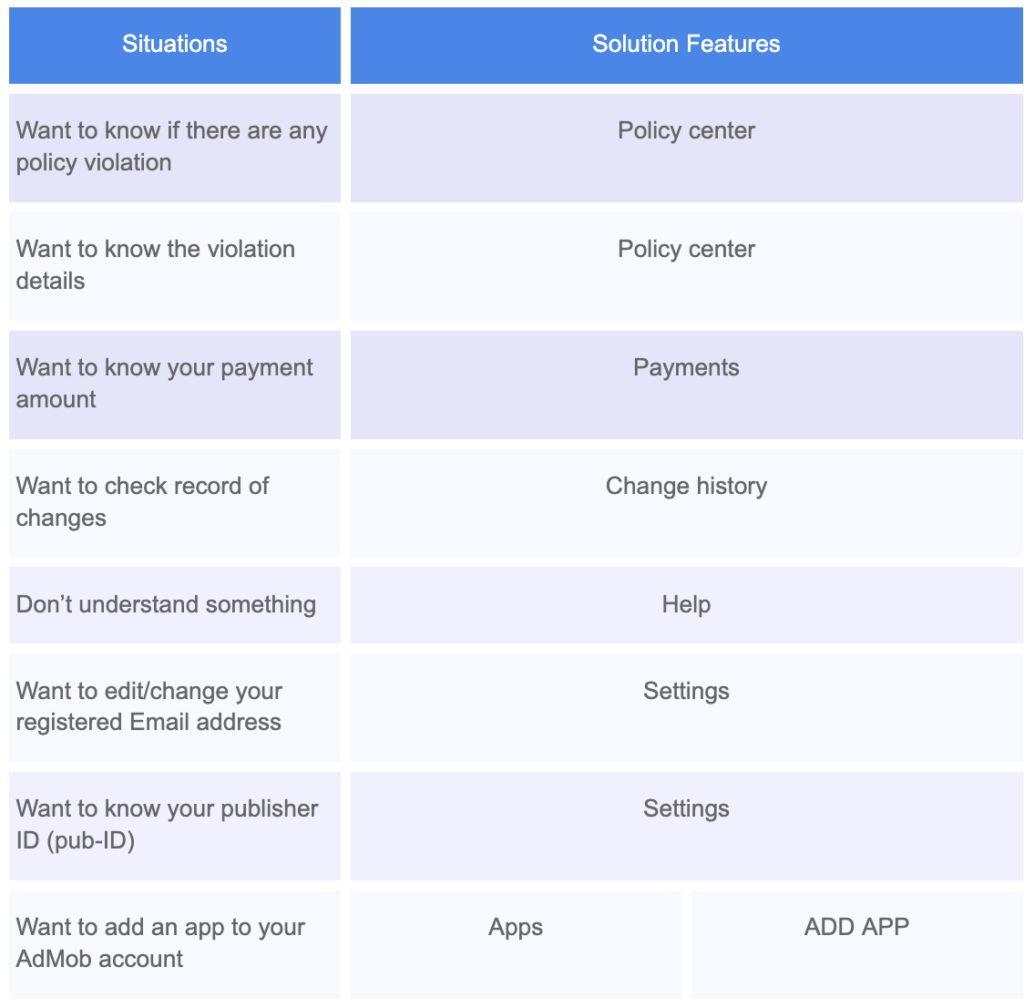
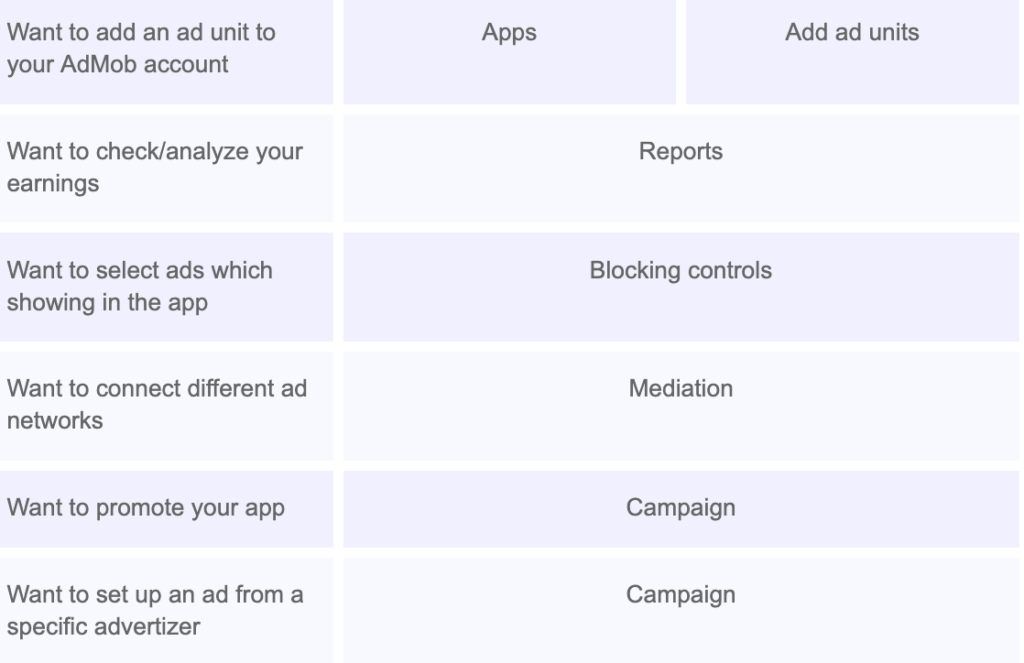
5. List of AdMob features you should go to for situations
The table below summarizes the features that you should try for each situation.


In the next volume, we’ll focus on Mediation which helps boost your earnings. It’ll answer questions like: What is Mediation? How do I set it up? What’s the benefit of using it?


